In this part we will see the concept of Serial communication. The communiction etween two devices can be in two ways;
Consider transferring 4 bit data from Device A to Device B
- Parallel Communication, in which all the 4 data bits from Device A will get transferred to the Device B simulatneously through four seperate data lines.
- Serial Communication, in which the data from Device A to Device B will happen through only one wire, but the transfer will be one bit after the other.
The benefit of Parallel communciation is its high speed but the hardware complexity is high, this will increase the form factor, cost etc.As the technology is improving the speed of serial communication is getting better and better and most of the microcontrollers have option for serial communication such as UART.
In today’s post we can see what is UART protocol, communication in UART, programming UART in Arduino.
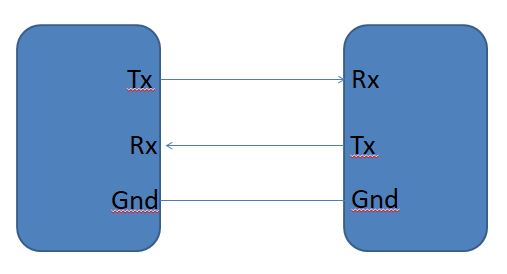
UART is universal Asynchronous Receiver Transmitter, is a common asynchronous serial communciation protocol which is available in most of the microocntrollers. In devices with UART, there will be one data transfer pin, one data receive pin and the ground has to be common and the connection will be ash shown below. The transmit pin of one device has to be connected to the receive pin of other and viceversa.
The data frame of UART have a start bit, then 8 bit data, a parity bit (optional) and a stop bit. There are lot of resources over internet to learn about serial communication and UART protocol. Lets focus on programming the serial communication (uart) in Arduino.
If we check Arduino Uno board, the digital pin no zero is RX and pin no one is TX pin. These pins are connected to the USB type B connector data+ and data – pins through the PCB. So, if you need to communicate with your Laptop, just connect Arduino uno to lapto through USB cable and then we can communicate with Arduino uart with your laptop.
In every communciation there we need to specify the speed of communciation, in uart it is the baudrate. In arduino the baudrate can vary from 2400bits per second to 15200bits per second. To specify this in our code there is one function,
Serial.begin(baudrate);
eg: Serial.begin(9600);
This has to be written in the void setup( ) block and it is a hardware initialization.
Now lets see how we can Transmit a data from Arduino to other device. For this we have to use another function,
Serial.println( );
eg: Serial.println(“Hello”);
There are other functions to transmit data based on the data format, you can check it later.
Lets write a program to Transmit your name continously and we can see the data in the Serial monitor (the arduio IDE have this ). Also, in tinkercad , we have his serial monitor. Lets Write the program.
void setup( )
{
Serial.begin(9600);
}
void loop( )
{
Serial.println(” i am thomas”);
delay(1000);
}
Its a simple program. right. Now we can compile it and check the serial terminal ath the bottom of the ide.
Now let us see the Serial data reception. As we mentioned earlier, UART is an asynchronous communication and hence the device B doesnot know when the data from device A is coming. So, there is always a space in side the microonctroller to store the recevied data, it is called serial buffer.
So, inorder to read the serial data recieved, first we have to check, whether data is received and available in serial buffer. For that we have one function.
Serial.available ( )
This function will check the no of bytes in the serial buffer and return the count. So, inorder to check whethere a data is received, we have to do like as follows.
eg: if (Serial.available ( ) > 0 )
{
Read the data
|}
Inorder to read the data from Serial buffer, we have another function.
Serial.read ( )
This function will return one byte of Serial data stored in the serial buffer.
Now lets try this in a program. lets write a program to read the data received, and turn on an led if the data received is A and turn off if data received is B.
void setup( )
{
pinMode(5,OUTPUT);
Serial.begin(9600);
}
void loop ( )
{
if(Serial.available() >0)
{
if (Serial.read( ) == ‘A’)
{
digitalWrite(5, HIGH);
}
else if (Serial.read( ) == ‘B’)
{
digitalWrite(5, LOW);
}
}
Lets try this circuit in tinkercad and try entering different alphabets in the Serial terminal.
Serial communication is used in many devices like gps, fingerprint modules, rfid and a long list will be there.
This is just nd intro post. We will look in to more later.